Treating wood means applying a protective system that defends timber against moisture, UV light, fungi and wood-boring insects, the four agents behind every form of timber failure. The right approach to protecting indoor and outdoor timbers depends on whether the wood lives outdoors, indoors, in ground contact or under constant sunlight, since each environment attacks the fibre in a different way.
Untreated timber left outside can lose structural integrity within a few seasons, while indoor pieces darken unevenly, soak up spills and scratch under daily use. A correctly chosen treatment extends service life by years or decades, depending on the product and the exposure.
The sections below cover outdoor protection methods, a practical DIY workflow, product selection for specific use cases, indoor finishing, and how to deal with rot once it has started. Whether you are sealing a new fence, refinishing a deck or rescuing a softening windowsill, the guidance applies directly to the work in front of you.
How to Treat Wood for Outdoor Use: 5 Proven Methods
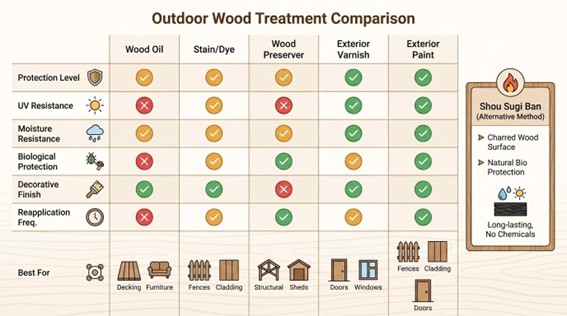
Outdoor timber needs a treatment that blocks three threats at once: moisture, UV radiation, and biological attack from fungi and insects. Five proven options handle these threats in different ways: wood oil, stain or dye, wood preserver, exterior varnish, and exterior paint.
Wood oil (Tung, Linseed, Danish, or specialist Decking oil) penetrates the grain and nourishes the timber from within. It suits garden furniture and decking because the finish stays flexible and never peels. Reapply roughly every 12 months, or sooner if water stops beading on the surface.
Stains and dyes add colour while letting the grain show through, which makes them popular for fences and softwood cladding. They are decorative rather than protective, so apply a wood preserver underneath if the timber faces real weather exposure.
Wood preserver contains fungicides and insecticides, and works as a base coat on fences, sheds, pergolas, and structural timber. It stops rot and woodworm before any topcoat goes on, and should always be the first layer on bare exterior softwood.
Exterior varnish is a film-forming clear coat that shields doors, windows, and trim against UV and driving rain. Once it starts to flake, sand back to a sound surface and recoat, since damaged film traps moisture beneath it.
Exterior paint delivers the strongest weather barrier and a full colour change, making it the standard choice for cladding and fence panels where hiding the grain is acceptable.
One tradeoff matters: brush-on preservatives sit largely on the surface and rarely match pressure-treated lumber for ground-contact use, because the active ingredients never reach the core.
A traditional alternative bypasses chemistry entirely. Shou sugi ban, the Japanese technique of charring the surface, is used on TimberSol’s charred cladding to protecting indoor and outdoor timber through carbonisation, repelling water, insects, and fungi without preservers.
How to Treat Wood at Home: A DIY Guide
DIY treatment works well for fences, decks, sheds, garden furniture and indoor pieces, since brush, roller, spray and dip methods all reach the depth these applications need. Pressure treatment, by contrast, is an industrial process carried out before timber leaves the mill, forcing preservative deep into the cell structure under vacuum and pressure.
That distinction matters when choosing materials. For ground-contact posts, factory pressure-treated lumber outperforms any brush-on coat, while above-ground timber responds well to manual application.
The workflow breaks into three stages:
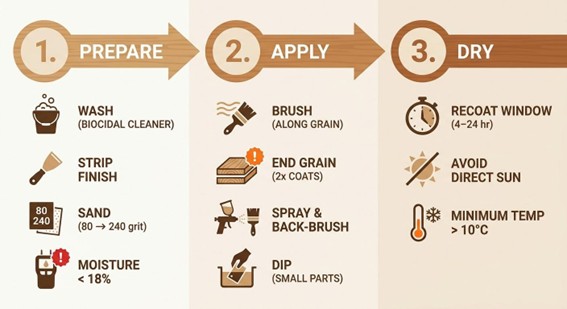
- Prepare the surface by cleaning, stripping old finish, and sanding.
- Apply the treatment along the grain in thin, even coats.
- Allow proper drying between coats so each layer cures before the next.
Skipping any stage compromises adhesion and shortens the lifespan of the finish.
Preparing the Surface (Cleaning, Stripping, Sanding)
Start by washing the timber with a biocidal cleaner to remove algae, mould, dirt and grease, because any contaminant left on the surface blocks penetration and traps moisture under the new coat.
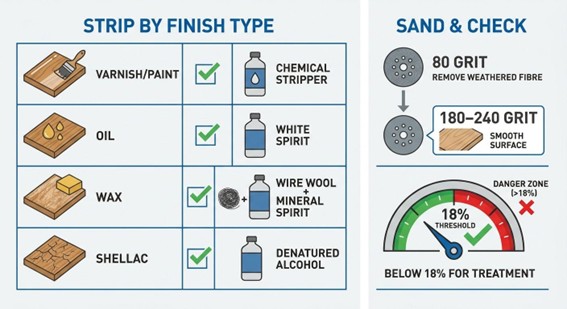
Next, strip any existing finish according to its type: a chemical paint stripper for varnish and paint, white spirit for oil, fine wire wool with mineral spirit for wax, and denatured alcohol for shellac. Mixing solvents wastes effort, since each finish dissolves only in its matching solvent.
Then sand progressively, starting at 80 grit to remove weathered fibre and finishing at 180 to 240 grit. The surface should feel smooth but remain slightly open, otherwise oils and preservers cannot soak in.
Finally, check moisture content with a pin meter and wait until the timber reads below roughly 18%. Trapped moisture causes blistering and adhesion failure once an oil-based or solvent product seals the surface.
Applying the Treatment (Brush, Spray, Dip)
Work the product along the grain with a natural-bristle brush for oils and preservers, applying thin, even coats rather than one heavy layer. Multiple light coats penetrate deeper and dry uniformly, whereas a thick film often beads, wrinkles, or stays tacky for days.
Treat the end grain twice, since it absorbs three to ten times more product than face grain and acts as the main entry point for water and rot. A second pass blocks capillary action where it matters most.
For fences, sheds and cladding, a low-pressure sprayer covers ground quickly. Always back-brush immediately afterwards to push the liquid into the grain instead of leaving it sitting on top.
Dip-treating small components such as battens, pegs and finials gives more uniform coverage than brushing, since every face and end is wetted at once.
Respect the manufacturer’s recoat window, usually 4–24 hours, and avoid applying in direct sun or below 10°C, as both extremes disrupt curing.
Choosing the Right Product: Preservatives, Stains, Oils and Finishes
Match the product to the use case, not the other way round. A finish that excels on a kitchen worktop will fail on a fence post, and a heavy-duty preserver belongs nowhere near a chopping board.
| Use case | Recommended product | Reapplication |
| Outdoor structural timber | Wood preserver + topcoat | 2–3 years |
| Decking | Decking oil | 12 months |
| Garden furniture | Teak or Danish oil | 12 months |
| Fence panels | Wood preserver or charred cladding | 5+ years |
| Indoor furniture | Hardwax oil or polyurethane | 5–10 years |
| Kitchen worktops | Food-safe mineral or pure tung oil | 3–6 months |
| Cutting boards | Food-grade mineral oil + beeswax | Monthly |
The split is logical: outdoor timber needs biocidal protection plus a weather barrier, while indoor pieces only need a finish that resists wear and stains.
For indoor air quality and food-contact surfaces, lean on low-VOC and natural options: raw linseed oil, pure tung oil, beeswax, and hardwax oil. These products cure without releasing the solvents found in conventional varnishes, which matters in bedrooms, kitchens, and homes with children or pets.
Pre-charred cladding offers a different route entirely. The carbonised surface repels water, insects, and fungi without chemical preservers, since the carbon layer is biologically inert and hydrophobic. Charred cladding therefore stays maintenance-light for five years or longer between recoats of protective oil.
How to Treat Wood for Indoor Use
Indoor timber rarely needs a preserver because it is not exposed to rain, ground moisture or temperature swings that drive fungal decay. A clear finish is still worth applying, since it shields the surface from hand oils, dust, scratches, spills and the uneven darkening that sunlight causes over time.
Some surfaces can stay raw. Wall panelling, ceiling boards and decorative beams sit out of reach and out of contact, so leaving them untreated is fine if you accept gradual colour change as part of the look.
For furniture, three finishes cover most situations. Hardwax oil keeps a natural, matte feel and is easy to spot-repair. Water-based polyurethane offers the highest scratch and stain resistance for tables and cabinetry. Traditional wax delivers a soft sheen on low-traffic pieces like sideboards and frames.
Kitchen worktops and chopping boards need a food-safe option. Apply pure mineral oil or raw tung oil and reapply monthly until the wood stops absorbing, then every few weeks during normal use.
Wood floors split along traffic lines: water-based polyurethane suits hallways, kitchens and living rooms thanks to its abrasion resistance, while hardwax oil works better in bedrooms and studies thanks to easier patch repair.
Choose low-VOC formulas for bedrooms, nurseries, kitchens and homes with children or pets, since solvent-heavy finishes off-gas indoors for weeks after application.
How to Stop Wood from Rotting (and Treat Wood That’s Already Rotted)
Stop rot by keeping timber dry and sealing it with a fungicidal preserver; treat existing rot by cutting out the affected fibre and consolidating what remains. Fungal decay needs moisture above roughly 20% to start, so moisture control matters as much as any chemical treatment.
A reliable prevention routine covers five points:
- Ensure drainage so water never pools on horizontal surfaces or end grain.
- Raise timber off the ground using gravel, joist hangers or post supports.
- Ventilate enclosed structures like sheds, decks and subfloors to release trapped humidity.
- Seal end grain with two coats of preserver, since it absorbs water fastest.
- Reapply a quality preserver every 2–3 years, or sooner if water stops beading.
Wet rot stays localised in damp timber and feels soft, dark and spongy. Cut out all affected fibre back to sound wood, dry the area thoroughly, brush on a fungicidal wash, then rebuild the profile with an exterior two-part wood filler.
Dry rot (Serpula lacrymans) is more serious because it spreads through masonry and dormant timber, surviving on minimal moisture. Strip back contaminated material generously, apply a wood hardener to consolidate weakened fibre, fill, and treat all surrounding timber and adjacent brickwork with a fungicidal preserver.
Woodworm is a separate threat. Small round exit holes and fine powdery dust (frass) signal active beetle larvae inside the timber. Treat with a permethrin-based woodworm killer applied generously to bare wood, and replace any pieces that have lost structural integrity rather than relying on chemicals alone.
How to Treat Wood: FAQ
What Is the Best Thing to Treat Wood With?
The best product depends on the use case. For outdoor structural timber like fences and joists, choose a wood preserver with fungicide and insecticide. For garden furniture and decking, use a wood oil such as Danish, teak or decking oil. High-exposure doors, windows and cladding need exterior varnish or paint, while indoor furniture and floors perform best under hardwax oil or polyurethane.
Preservers defend against rot and insect attack at the fibre level, whereas finishes mainly seal the surface against moisture, abrasion and UV. Most outdoor projects need both: a preserver as the base coat, then a topcoat that handles weather and appearance.
Can I Treat Wood Myself, or Do I Need Pressure-Treated Lumber?
DIY treatment works well for fences, sheds, garden furniture and indoor pieces, since brush, spray and dip methods reach the depth these uses require.
Ground-contact applications are different. Pressure-treated lumber outperforms any brush-on preserver here, since surface coatings rarely penetrate beyond a few millimetres while pressure forces preservative into the core.
When DIY is the only option for buried or load-bearing timber, soak the end grain in preserver overnight or dip-treat smaller components, since end grain absorbs several times more product than face grain.
What Can I Put on Wood to Stop It Rotting?
Apply three layers in order: a biocidal cleaner to kill existing spores and algae, a fungicidal wood preserver to poison new growth, then a weatherproof topcoat such as oil, stain or paint to seal moisture out.
Chemistry alone won’t save badly placed timber. Rot needs moisture above roughly 20% to start, so drainage, ventilation and off-ground mounting matter as much as the products you brush on.
How Often Should I Retreat Outdoor Wood?
Retreatment intervals depend on the product: roughly 12 months for oils and stains, 2–3 years for quality preservers, and 5+ years for high-end exterior finishes and charred cladding.
The practical trigger is simpler than any calendar. Splash water on the surface; if it soaks in instead of beading, the protective layer has worn through and the timber is ready for a fresh coat.
Do I Need to Treat Wood That’s Staying Indoors?
Structural treatment isn’t necessary because indoor timber stays dry and out of reach of decay fungi. A clear finish is still worth applying to block dirt, hand oils, scratches and uneven colour change from sunlight.
Choose polyurethane for high-traffic floors and worktops, hardwax oil for furniture, traditional wax for a soft sheen, or a soap finish for Scandinavian-style tables. Use low-VOC products in bedrooms, kitchens and on food-contact surfaces.
Treating wood well comes down to matching the right product to the right environment, then keeping up with retreatment before decay takes hold. For projects where long-term protection matters as much as visual impact, charring offers a chemical-free alternative that outlasts most surface coatings.
At TimberSol, we craft Yakisugi-inspired charred cladding that resists rot, insects and UV damage for decades with minimal upkeep. Whether you’re planning a contemporary façade or a feature wall, our team is on hand to help you choose the right finish, profile and timber species for the job.
Find a Home-Based Business to Start-Up >>> Hundreds of Business Listings.